Showing posts with label recipes. Show all posts

Wednesday, September 2, 2015

It's My Minestrone and I'll Cry if I Want To*

*no actual crying occurred 


I am not a person who generally considers soup to be a legitimate meal. I've said it one hundred of times before, but eating soup is only good if you want to be hungry again in thirty minutes. 

But that was in the olden days of being in college, of canned Campbell's chicken noodle for supper when I had used up my meal plan for the week. 

I'm still one who generally skips that portion of a restaurant menu, but I have come around to the idea of soup as a satisfying lunch or dinner. Turns out, watery broth with thin noodles and tiny bits of chicken from a can is at the bottom of the soup quality scale. Rich, creamy potato with scallions and bacon or hearty minestrone garnished with fresh basil and Parmesan are where it's at

So let's talk minestrone. I have made it before and my favorite recipe is by Ellie Krieger of the Food Network. (Can't be bothered to link to it, you can use the Google.) But the beauty of minestrone is that it's a very accomodating type of soup. You can add or subtract ingredients as you please. A learned chef might argue that if you add and subtract too many things, you end up with something that's not minestrone at all. To them I say semantics won't make the soup taste better.  

Today at work (in my kitchen job) we were dreadfully slow so I decided to make minestrone for lunch for myself and the other employees. My number one love for my job is the latitude to create whatever I want in the slow periods, time and ingredients permitting. Seriously. WHATEVER. I. WANT. 

I grocery shop for the weekend supplies on Thursdays, so the pantry and fridge were on the bare side. Every recipe I pulled, I was missing three or four of the major ingredients. One even called for cabbage. What is wrong with you, Martha? No one likes leaves in their soup!  I put all the recipes aside and made the soup with what we had on hand that sounded good to me. 

Why is this noteworthy, you ask, that sounds like a normal course of events to the seasoned cook. But here's a secret about me: I HAVE NO IDEA WHAT I'M DOING. EVER. I'm winging it in there, 24/7. I've never been formally trained. I make a mess, use too many bowls, and I hope you never have to witness my knife skills. I've broken spatulas, glasses, the butter dish, pots and pans, and even started two (2!!) small fires. 

My saving grace is that I know two important safety tips: always cut away from yourself and never use water to put out a grease fire. Seriously, those are the only reasons why I still have all of my fingers and eyebrows and I have never burned down a building. Were it not for my winning smile, can-do attitude, and innate ability to never overbake the cookies, my dear boss would have sent me packing ages ago. 

And so I rarely improvise. I'll substitute and skip a step here and there but for safety (and insurance) reasons, I FOLLOW DIRECTIONS. Until today. I threw caution to the wind (but carefully and away from any open flame) and made soup. And here it is. 

ELLIE'S MINESTRONE
(Me Ellie, not the Food Network lady)

1 tbsp olive oil 
1 tbsp minced garlic (about 2 cloves)
1 green onion, diced
1 celery stalk, diced
1 tsp Italian seasoning
Salt and pepper (whatever feels right)
1 can of diced tomatoes
1 15 oz can Great Northern beans, drained and rinsed
1 14 oz can French-style green beans, drained
4 cups chicken broth 
2 cups water
1 cup elbow macaroni

1. Heat the oil in your soup pot. Add the garlic, onion, and celery; sauté til celery softens, about 5 or 6 minutes. 
2. Add the seasonings and the diced tomatoes, juice and all. Let cook a little more. (No idea how long, really. A minute or two? Just until it smelled yummy and tomatoey.)
3. Add both kinds of beans, the broth, and the water and bring to a low boil. 
4. Add the pasta and let simmer 10-15 minutes. 
5. Ladle into bowls, pray it tastes ok, and then dig in. 
(Spoiler alert: it tastes ok. Good, even.)

There's at least eight things wrong with this recipe, including things like sautéing in a soup pot (amateur hour!) and using green onion (all onions are not created equal, you moron!). Also, in a perfect world, I would have added carrots and fresh green beans and grated parm--WHATEVER, IT WORKED. 

Those are the things I had, I put them together, and most importantly, I didn't apologize for the outcome. 

"Soup's up, take it or leave it."
We took it. And we liked it. 

Day 2: Try improvising


Monday, May 12, 2014

Chocolate Madeleines


One cold snowy day in March, I was nosing around the kitchen when I found a Madeleine pan I picked up a few months ago.  I decided it was time to see if these delicious French treats were really as easy to make as the recipes claim.  After a little bit of research I went with this recipe and was very pleased with the results. (That link is to a Google Doc, which is easily read and printed so you're welcome.)

Well, file this under "Fancy yet almost Foolproof Desserts", which is rather narrow category as any baker will tell you.  But what exactly are Madeleines? They are small, spongey, shell-shaped tea cakes that come in every flavor and are often best enjoyed at afternoon tea with Marie Antoinette.  But just in case you don't live in pre-Revolutionary War France, they also make for a lovely after-dinner treat when paired with coffee.  You know, when you want something sweet and decadent without the commitment of a four-layer chocolate torte.  

Traditionally, Madeleines are a vanilla flavor with a hint of citrus from orange or lemon extract but if you know me at all you know it's chocolate or get out of my kitchen.  To be fair, traditional Madeleines are incredibly delicious, especially if they are drizzled in a light vanilla glaze. Here is a very detailed and beautifully photographed tutorial from The Kitchn on making classic Madeleines, if chocolate is not your fancy.

There are three things to remember for achieving that slightly crispy outside and soft, spongey inside texture that is unique to Madeleines:

1) Grease the pan very well, whether it be with butter and flour or cooking spray. A Madeleine stuck in the pan doesn't do anyone any good.

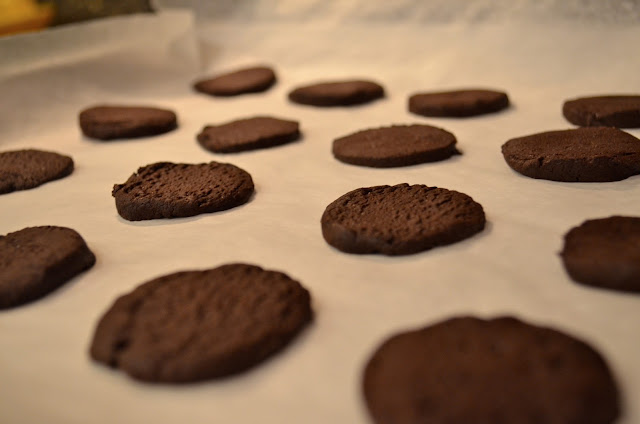
2) Do not under or over fill the molds. As you can see with my first batch, the cakes were a little small and so a bit dried out.


 A generous tablespoon of batter does the trick. This was my second batch.


3) Do not overbake.  The chocolate Madeleines are a little harder to judge by sight, as they do not change to the beautiful golden brown of the classic ones.  Everyone's ovens vary, but I found right about nine minutes to be the sweet spot. The cakes were soft, moist, and sprang back when I touched them.


You can get extra fancy and dust them in powdered sugar or melted white chocolate but I found they tasted lovely as is. The only downside is that these little cakes only last for a day or two, but they are so yummy that it's not usually a problem.

Well, what do you think? Do you see yourself making these? Any variations out there that I should try? Most importantly, will you travel to Versailles with me? I have a sudden urge to take tea in the palace garden...

Thursday, March 20, 2014

5 Ingredient Pasta Dish

Good evening my dears.  A little while ago, a challenge was thrown out there on forums of the blogger network 20sb. Can you make a pasta dish with just five ingredients, including the pasta? 

Challenge accepted. 
I love pasta. It is one of those foods that I would happily eat every day.  
There are SO MANY THINGS you can do with it.  I am fan of spaghetti and meatballs as much as the next gal, but I also love making up sauces, trying out all different kinds of noodles, and seeing just how many ways I can incorporate it into a meal.

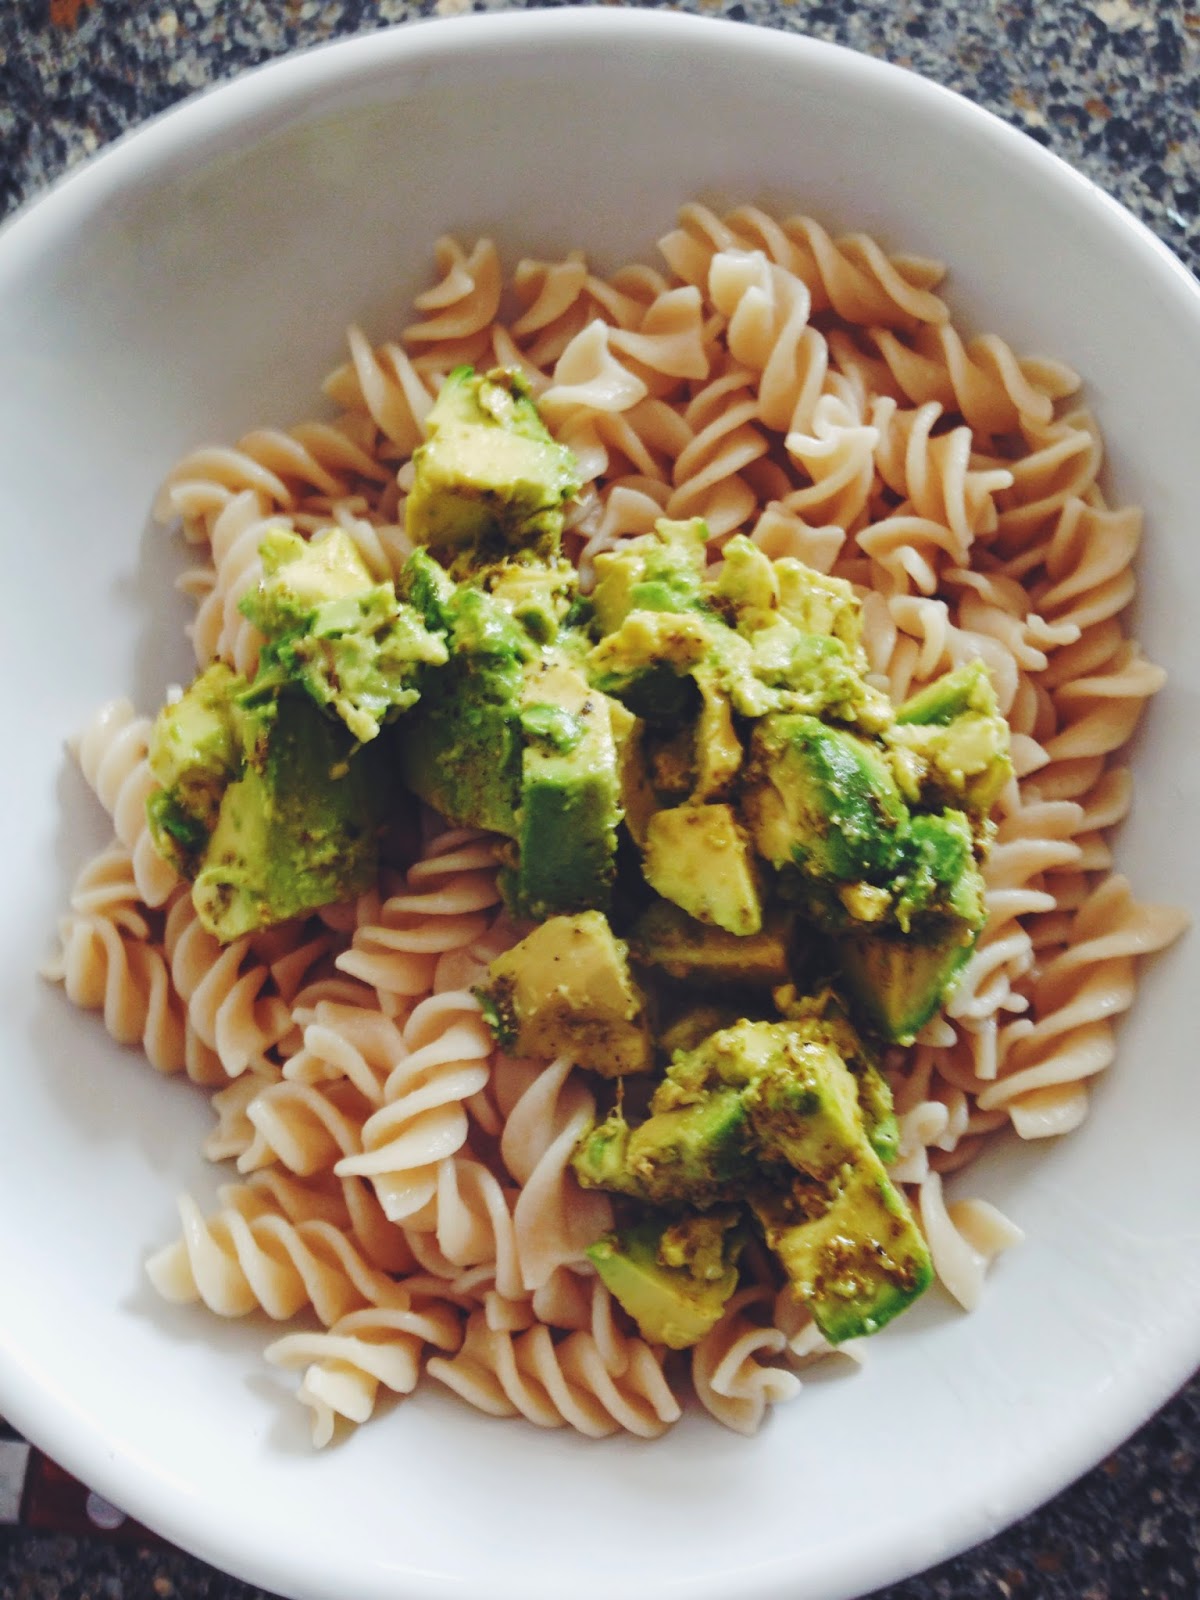
One of my absolute favorite recipes is an avocado, basil, bacon, and parmesan pasta.  But that requires more than five ingredients.  With that recipe in mind, I made a pared down version for one that happened to be vegan and gluten free. Bonus! In my house, if you can make something vegan, gluten free, AND delicious, well you should run for office because clearly you are magic.

What I'm trying to say is that I'm a wizard.  Sometimes.

Anyway, here are my five ingredients (not counting water and salt as per the rules, though salt is pictured):
+A couple ounces of brown rice noodles (I used rotini)
+1 ripe medium sized avocado
+A sprinkle (or two) of coarse black pepper and sea salt
+A generous splash of lemon juice
+A spoonful (or two) of basil pesto

I didn't measure anything, which I realize is not very helpful but I sort of eyeballed the ingredients and tasted as I went.  Listen, if you came here for precision and magazine-ready food photos, you came to the wrong blog, pal.  


 Boil the water per package directions, and pour in what you would consider a serving size of noodles.  As brown rice pasta is pretty sturdy, it needs to boil for about 11 minutes to be al dente.

While the pasta is cooking, slice open the avocado, remove the stone, and cut into large chunks.  Scoop out the avocado into a small bowl, add the salt, pepper, lemon juice, and pesto and toss together.


Drain the pasta, pour into your dish and top with the avocado mixture.


Mix it with your fork and ENJOY. 

THAT'S IT. In fifteen minutes you have a super delicious and filling meal. Obviously you could jazz it up with a sprinkle of fresh parmesan or some bacon but it tastes excellent as is. The lemon juice adds a brilliant zing that plays well off the smooth flavor of the pesto.

I feel for judging purposes I should clarify: I never salt the water I boil pasta in so I didn't feel bad for adding it to my topping. Secondly, using pre-made basil pesto is probably cheating a little but it came in one jar and I regret nothing. 

So, what do you think, would you try this recipe? Are there any pasta recipes you're fond of that I should try? Let me know in the comments. :)

Thursday, January 23, 2014

Red Velvet Crinkles and a Baking Video

Boy do I have a treat for you today. As you should know by now, we are quickly approaching my favorite holiday. (Re: this post, that post, and also this one)

Three cheers for Valentine's Day. *wiggles eyebrows*

Since we have four weeks until the actual day, I'm going to post something Valentine-themed every Thursday until Friday the 14th.

This week is a cookie recipe that I found on Cooking Classy. Have you ever had chocolate crinkles? I discovered these yummies in college. If you don't know, they are a chewy chocolate cookie with a beautifully-crackled powdered sugar top.  I saw this red velvet version at Panera Bread the other day and decided to make some myself in honor of the holiday. It creates a more cake-like cookie than traditional crinkle recipes but it tastes just as divine as a slice of the cake it is named for. 


It's got a light moist texture, that lovely crinkled coating, and white chocolate chips inside to compliment the mild cocoa flavor.  

They also photograph beautifully. In case that's important to you.  


Anyway, I did something a little different and made a video while I was baking. (Again, recipe found here.) I filmed the first half using a tripod and then my mom volunteered her hands so I could operate the camera for the second half (In case you notice the sudden appearance of a wedding ring. It's not mine.) 

I've never done this before so please forgive any unfocused parts and how awkward my voice sounds.  Nothing makes you hate the sound of your own voice more than recording voiceovers, I learned.  I am usually way less serious and bored-sounding in conversation.  Oh well, at least we know I'm not cut out for radio!


Well, what did you think? Should I do more baking tutorial videos or is my time on YouTube something that needs to be quietly put away in a drawer? And most relevant, will you be making these cookies??  All important questions.

That's all for this week! See you next Thursday, lovebirds! 
xx

P.S. Past Valentine's Day cookie recipes: heart-shaped Lofthouse cookies and chocolate mint sandwiches

Wednesday, July 24, 2013

Best Ever Basic Chocolate Chip Cookies

Nothing is better than a chocolate chip cookie fresh out of the oven. 
Nothing. 
Ok some things are equally as good, but nothing is better.


No two chocolate cookie recipes are the same, though.  There are a thousand different ways to satisfy your cookie craving. Do you like flat and slightly crispy cookies? There's a recipe for that. Do you prefer artisanal takes on the standard chocolate chipper, with sea salt and caramel chips? You can bet there's a way to make them.  Are you a vegan or gluten-free? Recipes galore!

Previously I had two go-to recipes. One is the thick and buttery version my grandmother created.  The second is my mother's modern adaptation of the first recipe, with whole wheat flour and oats.
Both recipes produce equally delicious and satisfying cookies.

But now I have a third recipe, found here. It's one that makes incredibly soft and chewy cookies and provides a perfect base for experimentation. The beauty of this particular recipe is that these cookies still taste as soft and fresh three days after baking as when they first came out of the oven. Plus, you don't need a mixer to make them, which is a huge bonus.

I followed the recipe exactly, with the exception of reducing the cookie size. I don't know what it is, but I prefer smaller cookies. These were about the size of the palm of my hand. Plus, I was able to make three dozen out of what was supposed to be 16 cookies.

Mmm...just look at that dough...


There are a few secrets to making the perfect cookie:
1. For the best flavor, refrigerate the dough. I know it's an exercise in patience but refrigeration is what gives the ingredients the time to mix and mingle like they should.
2. The softness and chewiness are a result of two things: the addition of cornstarch and underbaking it. Seriously. Whisk those puppies right out of the oven the minute they look golden. Not golden brown, but golden.
3. Chocolate chip quality matters. Call me a snob but chalky, dry chips really take away from the overall quality.  If you're going to be ingesting the unnecessary calories, why not make them the most delicious calories? Personally I prefer Guittard brand (found at H-E-B stores), but sadly they are not sold in Indiana.  Fortunately, I have a sister in Texas who brings me a stash when she comes to visit.

The only thing left to do? Why, enjoy them with a glass of milk of course!


If you try them let me know. I would highly recommend it.
Do you have a favorite chocolate chip cookie recipe? Any additions I should try?


Wednesday, April 10, 2013

25 Awesome Things about My 25th Birthday

1) This party hat, which I wore unashamedly. I even posted this picture to Facebook, with the caption "wearing this all day and no one can stop me".


2) The subsequent photo my dad sent me of himself at the airport, with the exact same caption:

He is such a riot.

3) The fact that it was Saturday. Which is the best day of the week, obviously.

4) The constant stream of social media notifications. Say what you will about the "happy bday" message from people you barely talk to throughout the year, but I totally dig it. It's like walking down a digital receiving line in which people I know remember and acknowledge how awesome I am. And everyone who doesn't acknowledge on the Internet is dead to me, of course. 

5) Having all the right ingredients to make a lemon and sour cream cake (recipe here).

Thursday, March 21, 2013

Anne's Kitchen: Southwestern Quinoa with Black Beans and Toasted Pecans


For the second installment of Anne's Kitchen, my mom is sharing my absolute favorite meal, and this one is totally vegan. It is one of the stranger-looking meals (the comments I got at work from coworkers who saw me eating this in the break room...!!) but it is an amazing mixture of texture and rich flavor, not to mention how filling it is. One of my major critiques of vegan cooking is that I never feel satisfied after eating the way I do after I've had a piece of meat, but this meal blows that out of the water.  It is so rich in protein, good fats, and complex carbohydrates that I always feel like I've had a feast, but totally guilt-free! A photo of the complete recipe is found at the end of the post.

----------------------------
This is a recipe that my non-vegan daughter likes.  I know this because not only did she eat it when I served it, but she called dibs on the leftovers for lunch the next day.   

It's always a good thing to compliment your mom's cooking, but to eat it again as leftovers! Well, that is like icing on the cake.  In this case, better for you, too. 

Especially this dish ... Southwestern Quinoa with Black Beans and Toasted Pecans from the October 2012 issue of Vegetarian Times.  

Quinoa gets a lot of attention because it is high in protein.  So are beans, lentils, nuts, seeds, whole grains, peas, and leafy greens. If you're interested in the basic of nutrition on a vegan diet, this is a great place to start.

So not only is this dish nutritious, it is tasty and has great texture!  As my husband, who has no sense of smell, will tell you, texture is very important. 

Here are the ingredients, all set out and ready to measure.  (If I wasn't taking pictures, I wouldn't do this, but it is a handy thing to do.)

Friday, February 22, 2013

Anne's Kitchen: Totally Scrumptious Vegetarian Pizza


Hello friends! I know most of my readers enjoy sharing recipes and if they manage to be delicious AND healthy, it's sure to be a winner. Unfortunately for our waistlines, I think every recipe I've posted on here so far has been for desserts and baked goods. No one could ever accuse me of withholding from my sweet tooth.  As much as I love baking, I wish I were better at cooking.  I'm not talking four-course dinners with foreign sounding names but just mastering simple, healthy, and flavorful meals.

As you may or may not know, I currently live with my parents, both of whom have been eating a plant-based diet for the last year.  It is primarily vegan but as it is for health reasons and not necessarily moral ones, my mom has no problem throwing in the odd bit of cheese or eggs to make certain meals more palatable to my 10 year old brother and I. (Yes, we are on a very similar level taste-wise. No, I am not ashamed.)

After being home for the last nine months, I'm slowly coming around to this lifestyle as much as I hate to admit it.  There are still many vegan staples I just cannot get behind, for example, no mushrooms will knowingly pass these lips and the same goes for beets and tofu NO THANK YOU.  But I'm surprisingly on board with black beans and sometimes I even crave quinoa.

Although that doesn't mean I don't still weep with happiness over a perfectly barbecued piece of marinated chicken. (Seriously, Ric and Carole, last Sunday's meal was the business.)

All this is to say I'd like to encourage myself to make better choices for my health and to that end, I'm starting a new blog series spotlighting my mother and her healthy plant-based recipes. At as-yet-undecided intervals, she will be guest-posting her most successful meals under the title "Anne's Kitchen".

To start us out gently, she's starting with possibly my new favorite vegetarian meal that she's ever made: Totally Scrumptious Vegetarian Pizza. mmm....take it away Mom!
(All of the following words and photos are her own)
---------------------------------------

Friday, February 15, 2013

Lofthouse-Style Soft Sugar Cookies


When I was a kid, there was nothing more tempting on a trip to a grocery store than the bakery displays of Lofthouse cookies with their brightly colored frosting.  If we behaved, Mom would let us get a free sugar cookie from the lady behind the counter, but they were flat and hard and nothing like the pillowy-soft frosted cookies of my dreams.

Now that I’m all mature (questionable) and grown up (true), I can eat Lofthouse cookies until I’m lying on the floor in a sugar coma if I want.  Fortunately we grow out of our childish urges (mostly) and the few times I’ve had a store-bought Lofthouse cookie at a party or whatever, I find them to be a little dry and far too sweet.  But that nostalgic factor is still there, which is why I keep trying them. So all that is to say, I was a little excited when I came upon a recipe for them. And heart-shaped? Well, it’s perfect for the belated V-Day celebration I’m having with friends this weekend.

Since it's not my creation, I won't post the recipe here but you can find it on Two Peas and Their Pod.


The positive side of a recipe that requires refrigeration is that it cuts a little time out of the process when you’re ready to cut, bake, and frost.  By that I mean I made the dough on Wednesday night, which only took about 25 minutes, and then it was ready to roll out on Thursday.  This recipe makes a large amount of cookies, so I left 1/3 of the dough in the refrigerator in case my little brother & his friend want to make and decorate cookies this weekend. 

Spencer leaned over his homework to make the first cut. And that was the end of his helpfulness, until it came time to taste test.


My mom has a set of heart-shaped cutters with fluted edges but because the cookies rise so much while they’re baking, the pretty shape gets lost in the oven.


Mmm...heart sprinkles.....


My biggest critique of this recipe is the texture of the dough. It was in the refrigerator for 24 hours and it was still SO STICKY.  I didn’t add any extra flour to the recipe and if I made it again, I still wouldn’t because they would probably taste like biscuits. But flour the counter top. And flour your rolling pin. And flour your hands. And sprinkle a little flour on top of the dough just to be safe. And then when that’s all done, throw a little flour over your left shoulder and say a little prayer to the deities of baked goods for good measure. Ok don’t do that.
Also, only roll out a quarter of the dough at a time, keeping the rest in the refrigerator. The colder it is, the easier it is to work with.

So that may seem like extra work but it is worth it. These are amazing. Soft and cakey and the perfect vehicle for the fluffy buttercream.  Somewhere, 7 year old Ellie is laughing and crying and clapping her hands.  Well done, me, well done.


Wednesday, February 6, 2013

Chocolate Mint Sandwich Cookies

Hello from the middle of the week! We all need a little pick me up on Wednesdays, right? Well here’s a pile of freshly chopped chocolate for your viewing pleasure:


mmm…you can almost feel the endorphin rush...


In my last weekend links post, I shared a link to a Martha Stewart recipe for chocolate mint sandwiches. They are dark chocolate cookie wafers with a mint-infused ganache, enrobed in dark chocolate. Sort of like if a Thin Mint left the Girl Scouts, went to college and got a job working for a fashion magazine. Fancy.

Anyway, I couldn’t get them out of my mind, so I tried it. I’m not going to post the recipe (you can get it here) but here are some more photos from afternoon in the kitchen. Thank you Jami for taking these for me!


After you chill the dough, the recipe calls for rolling it out to 1/8” thickness and then using a cookie cutter to make perfectly round wafers but this is real life and ain’t nobody got time for that so instead I made two (mostly) even logs and then thinly sliced them into (mostly) even cookies. 


In my kitchen, taste trumps appearance so things like "evenly shaped" and "pretty" don't carry much weight.


While the cookies were cooling, it was time to make the ganache in the double boiler. Oh ganache, you wonderfully indulgent creature. Chocolate, heavy cream, and peppermint extract. Like, we're not even going to pretend there's anything healthy about that.

Saturday, September 8, 2012

S'more, Please!


Not counting the part where I was in my pajamas until 11 am, today was a really busy day. 

I finally started redoing that dresser I bought over a month ago from Craigslist. It took all afternoon and it's still not done. Turns out refinishing furniture is way harder than re-pinning fancy pictures to Pinterest. You actually have to, like, break a sweat. Ugh, drama.
But another post on that later.

Then I went out, sold a few kidneys, and bought a fancy new camera. I'm talking a legitimate DSLR with more megapixels than I have fingers. I'm so excited to join the ranks of all the other amateur photographers out there who take super sharp pictures with a really expensive camera only to ruin them with Photoshop filters so they look like they were taken with a disposable camera that somebody stepped on. #sorryI'mnotsorry

AND THEN I tried one of those recipes I blogged about the other day.  The Smore Bars. It's a perfect September dessert: it screams camping trips and flannel shirts and sticky fingers, without all the hassle of having to start a campfire. Plus it's crazy simple: you make a graham cracker cookie base, slap down two of the biggest chocolate bars you've ever seen, slather it in marshmallowy goodness, and then squish it all together with one more layer of graham cracker cookie delight. Bake for 30 minutes and then sit back smugly as your household praises you endlessly between bites. 

It smelled so good coming out of the oven, that even the vegans wanted some. And there's BUTTER in it! AND WHITE SUGAR, LIKE STRAIGHT UP PROCESSED.

I mean, I love my mom, but her "black bean brownies" don't cut it as dessert. It sounds like something they make you eat at a yoga retreat to cleanse your aura, not a tasty treat after dinner. 

At least she lets me occasionally tempt her back to the way of the unhealthy. Thanks, Mom. Maybe I'll go running with you tomorrow.*

*Let's not kid ourselves, I probably won't. But don't let that hold you back.

Wednesday, August 15, 2012

Shelly's Macaroons

This is my cousin Shelly.

(and her cheeky son :))

Shelly lives in New York and loves her boys, coffee, and chocolate in that order. She is the one who introduced me to Audrey, my dear Swiss friend, and was a constant encouragement during my time over there.  I love Shelly because not only is she always cheerful and kind, she is the only person I know who loves baked goods more than me. So when I found out that I would be seeing her last weekend, I knew I had to make her something.  It wasn't too long before I found the perfect recipe: coconut macaroons.  Simple, classic, and easily transportable for the 7 hour car trip. 

With just 5 ingredients, this was hands down the easiest cookie recipe I have ever made. I was in and out of the kitchen in 40 minutes, including bake time. Amazing! For an extra zing, I drizzled melted dark chocolate on top after they cooled. Delicious.


I would highly recommend using parchment paper to line the cookie sheet. As you may be able to tell in the above photo, I used wax paper and it was impossible to get them to come off cleanly. 
Nothing quite humbles you like watching people awkwardly pick off bits of paper from the bottom of your handiwork before taking a bite.

These were almost as good as seeing Shelly in person after so long. I'm just sorry I didn't stay and chat with you longer! 

Sunday, October 23, 2011

Recipe: Tarte Tatin

What do you do on a lazy Sunday evening when it gets dark too early and you've got a fridge full of delicious crispy apples?

Why, you make apple pie of course.

But not just any old apple pie, because these are Gala apples, too crunchy for baking. You make tarte tatin, an upside-down caramelized delight, found all over France. My dear host mother taught me to make this so many months ago in Switzerland. Having forgotten some of the finer points, what follows is a slightly different version from her creation. 

All you need is a 10-inch circle of puff pastry, 4 or 5 apples, half of a stick of butter, half of a cup of sugar and a sturdy 10-inch skillet. 

The hardest part is peeling, cutting, and coring the apples.
Literally where the expression "easy as pie" comes from. 

Preheat the oven to 425 degrees.

Coat the skillet with the butter and evenly spread the sugar. Lay the apple slices in tight concentric circles, covering the whole surface. Let cook untouched for 10-12 minutes on medium heat, or until the juices are bubbling and a deep golden brown. It's ok if the juice colors unevenly.

mmm...you can smell those apples cooking.... délicieux

Place the skillet in the preheated oven and let cook for 20 minutes.
When it comes out, (and for pete's sake, use an oven mitt, don't just grab the pan handle like I did) place the pastry circle on top of the apples and put right back in the oven for another 20 minutes, or until the pastry is puffy and golden brown. Seriously, use the oven mitt.


Let stand for at least ten minutes in the pan.
Shake the skillet gently to loosen the caramel. Place a larger plate over the skillet and flip over, making sure you have a firm grip on the skillet and plate.
And....behold!


Well hey there good-looking.

Don't be upset if some of the apples have stuck to the pan, just pop them out and squish-em right in to the tart. And don't weep if there are blackened patches. I promise it doesn't affect the taste. This is a treat that tastes better than it photographs, trust me.

Now this is a 10 inch pie, so technically it should serve 8 reasonable people. 
But it's Sunday night and we haven't eaten a real dinner.
This is no time to be reasonable.

In this house, it was cut into fourths and devoured with relish. Not with pickle relish, obviously, figure of speech here. Actually with vanilla ice cream. But you know what I mean.
Four slices of pie = four happy people. 
And that works out just fine.


Hope you had an equally tasty weekend!

Saturday, June 18, 2011

Baking EXTRAVAGANZA with special guest star Adam

 What do these three recipes have in common (besides being utterly delicious)?


Country Blueberry Coffee Cake


Chocolate Babka


Cocoa Frosted Coconut Cake


Answer: all three of them were made in the last 24 hours by Adam and I.
Yes, that's right. Three marvelous confections in a day!

But let me explain.  You see, Adam is a good friend of mine.  Some of you readers already know him. And I think you'd agree with me when I say he doesn't do anything halfway. When we want to be responsible citizens, most of us just vote and pay our taxes. But not Adam. He joins the Army and goes to the United States Military Academy for four years.  When he feels the need to exercise, he does a half marathon. So when he wants to bake, he won't stop until every last egg is gone and the whole house is under a fine dust of flour and sugar.

Whew. It is exhausting just being his friend.

I was not the least bit surprised when I showed up at his house yesterday with my mom's KitchenAid mixer and he already had a big stock of ingredients, a stack of recipes, and a fresh blueberry coffee cake waiting on the table.  Because that's just Adam.

But oh lands, what a coffee cake it was. Definitely the kind of pastry to get you in the mood for baking.

I took a photo of the coffee cake recipe. It's a Paula Deen creation, hence the quantity of butter. This is as American as recipes get, so my international friends will frown at the requirement for canned biscuit dough. I know better, I do, but it's so delicious and easy!


The next creation, perhaps the most delicious, was the most time-consuming: Chocolate Babka. This is a Middle Eastern sweet yeast pastry. A basic bread dough filled with a chocolate/cinnamon/sugar/butter mixture, twisted and twirled within an inch of its life, and topped with a flour/powdered sugar/butter streusel. We got this recipe from Martha Stewart's Baking Handbook (also found online here). It's great because even though it's involved, it yields three loaves and the dough can be frozen fully prepared for up to a month, should you want to bake at a later time.

I won't go through the whole process, as the recipe is quite thorough with directions. Including lunch (and dance breaks), it took us hours upon hours and I in no way stopped to photograph every stage. But here are a few shots anyway:


And the finished products (the third loaf went into the freezer) :

A cut inside:

Good grief. Who needs alcohol? I'm intoxicated from baked goods. This is literally the most otherworldly creation I have ever made/eaten. 

After that, we only put our feet up for a quick minute before moving on to tasty bit #3: cake.  Since today is Adam's mother's birthday, we took a favored family recipe and added a twist.  Three layer coconut cake but with a heavenly cocoa frosting instead of the traditional vanilla.

Adam's mom is definitely a Paula Deen fan, so the cake is another one of her inventions. We used her cake and filling recipes and Hershey's "Perfectly Chocolate" Chocolate Frosting recipe.

Again, not going to go through the whole process, since the cake recipe can be found here, but just a few photos:


It looks quite flat for a three-layer cake, but the lesson we learned here was this: self-rising flour. Which we definitely did not have. While a little disappointing in the presentation category, I have it on good authority that it is still quite delicious.

And so the day drew to a close. I am not a taste-while-cooking kind of person, but I still managed to be just a bit slap-happy from inhaling all the butter and sugar particles floating in the air. And I learned a few things about baking with another person. You have to keep a tight rein in the kitchen.

At the beginning of the day, Adam was behaving himself nicely.

But then he was getting a little handsy with the dough. Tsk tsk.

I wasn't afraid to keep him in line. That's right, Adam, you were streusel-slapped. Don't you touch that again.

As a less violent method of discipline, I made him wash the dishes. There's a good little helper. (Jillian, take note. He has kitchen potential as your future husband.)

 All in all, a very good day. But I need at least the weekend before I even look at the mixer again.
If you try any of these recipes, let me know how it turns out! Happy Baking!
 

design + development by kiki and co. creative